Saturday, April 17, 2010

Sweet Pea

Hey there stampers! Thanks for checking in with me!

Today's card is super simple.  The Sweet Pea Stitched Felt Flowers are so easy to use as a focal point or an accent to your cards and scrapbook pages.


STEPS:


  1. Start with a Rose Red card base, add a panel of Pretty in Pink and Very Vanilla stamped with the sentiment from the Nursery Necessities stamp set in Chocolate Chip.
  2. Add the Sweet Pea Stitched Felt Flowers to a panel of Very Vanilla card stock, mat onto Pretty in Pink and then onto Rose Red card stock.  
  3. Adhere to card and add 2 more stitched felt elements to the corner of the card.

INGREDIENTS:


  • STAMPS: Nursery Necessities
  • INK: Chocolate Chip
  • PAPER: Rose Red, Very Vanilla, Pretty in Pink
  • ACCESSORIES: Sweet Pea Stitched Felt Flowers, Tombow Multi Adhesive
  • TOOLS: none

Have a super day!  Come back again soon!
Hugs,

Friday, April 16, 2010

It's a Girl!

Hey there stampers! Thanks for checking in with me today!  I am so glad you did!

Today's card is the last from the Brides and Babies class.  A baby girl card in the shape of a bib!  So cute isn't it?  Again this is one I have seen on multiple occasions on multiple sites so I cannot tell you who came up with this idea first but i am so glad they did!


STEPS:


  1. Die cut Pretty in Pink card stock using the Big Shot and the Scallop Circle Die placing the card stock just inside the edge of the die so that approximately 5 scallops are omitted so your card will still have a fold.
  2. Cut a semi circle out of the "neck" (our punches will not punch through 2 layers of card stock-our paper is thick!) Using the Crop-A-Dile punch 2 holes and insert 2 Jumbo Eyelets and set.
  3. Insert Melon Mambo Polka Dot Ribbon through the Jumbo Eyelets and knot.  Add a bow using Pink Gingham Ribbon.
  4. Stamp the bird from the Nursery Necessities stamp set in Melon Mambo ink on Whisper White and punch with the 1" Circle Punch.  Add to Pretty in Pink punched with the 1 3/8" Circle Punch and finally onto Whisper White punched with the Scallop Circle Punch.  Adhere to card.
  5. Using the Melon Mambo Stampin' Write Marker add little dots to the scallops of the card and Scallop Circle.
  6. Step details

INGREDIENTS:


  • STAMPS: Nursery Necessities
  • INK: Melon Mambo
  • PAPER: Pretty in Pink, Whisper White
  • ACCESSORIES: Melon Mambo Polka Dot Ribbon, Pink Gingham Ribbon, Jumbo Eyelets
  • TOOLS: 1" Circle Punch, 1 3/8" Circle Punch, Big Shot, Scallop Circle Die, Crop-A-Dile, Scallop Circle Punch

Hope you enjoyed my card today!
Hugs,

Thursday, April 15, 2010

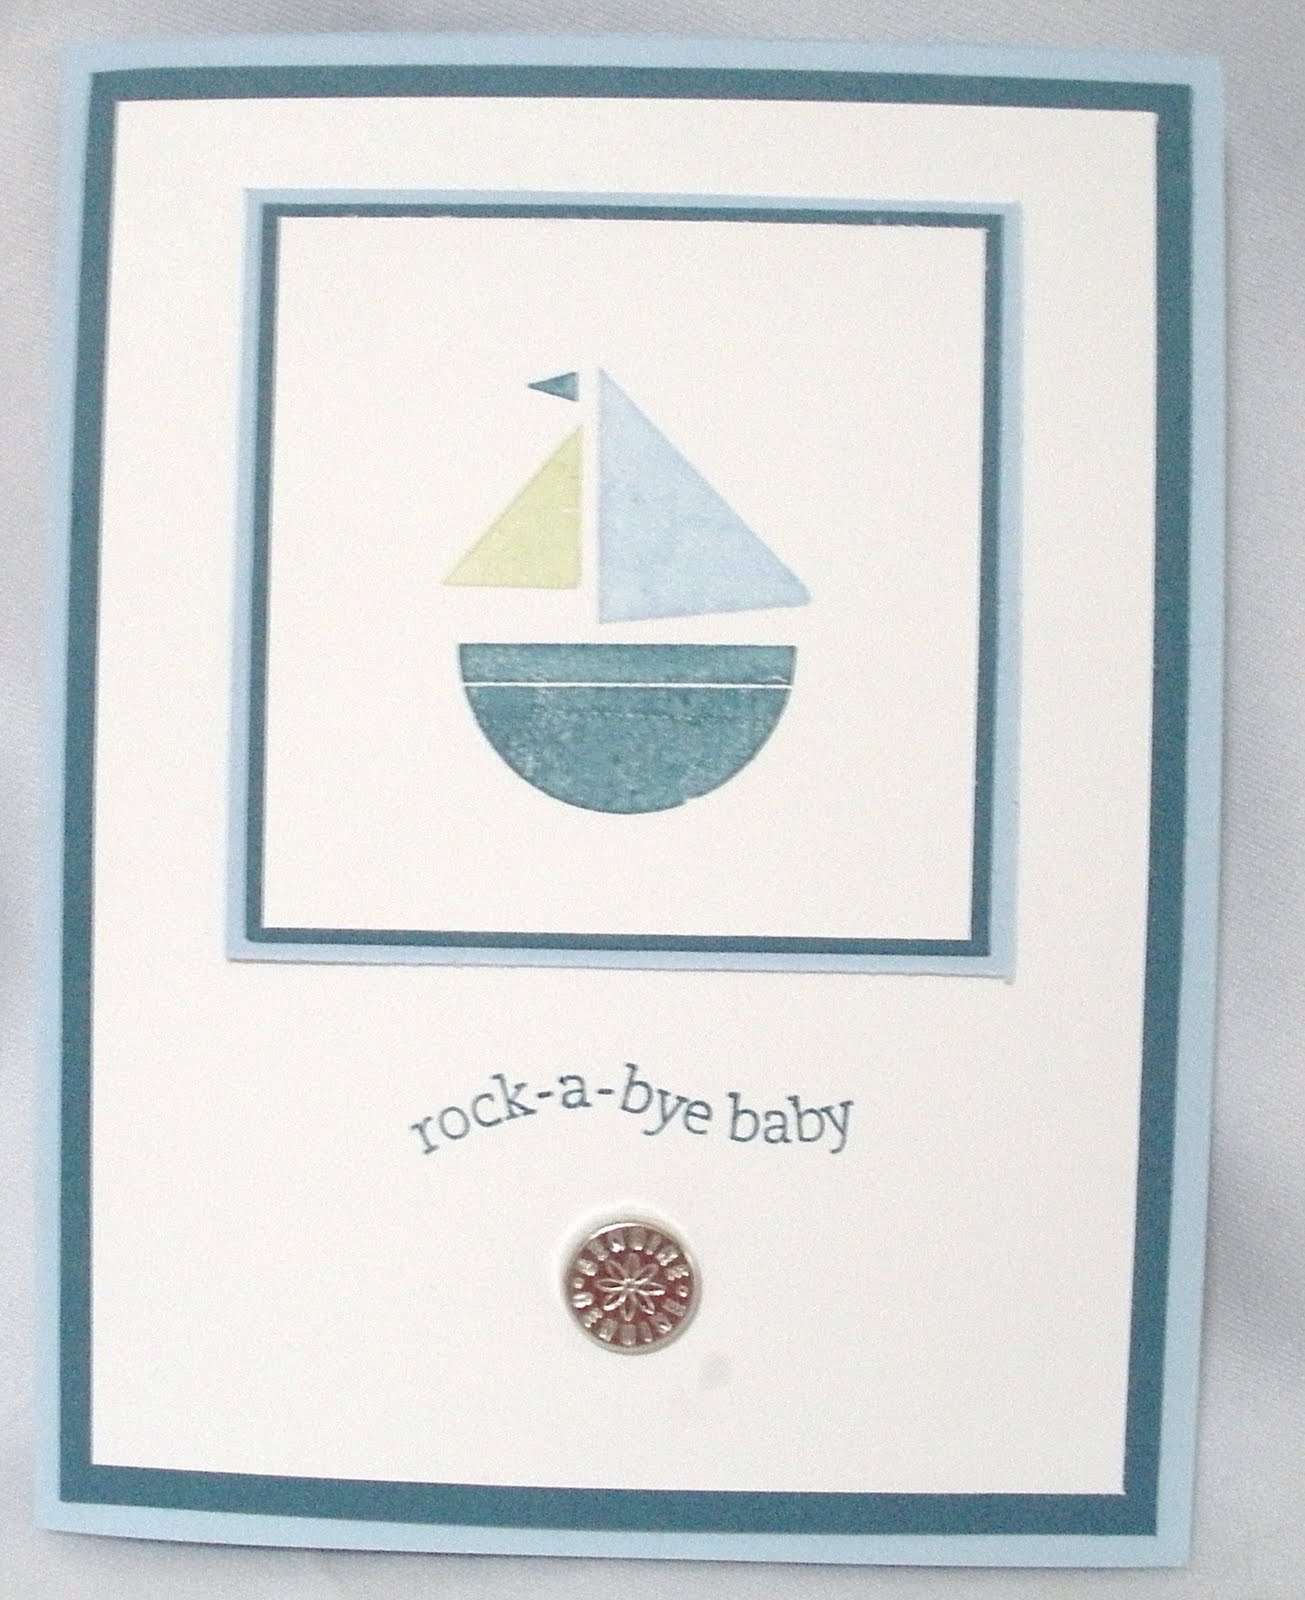
Rock-A-Bye-Baby

Hey there stampers! Thanks for stopping by today!

Today's card is yet another from my Brides and Babies class last Saturday.  We had such fun making these!


STEPS:


  1. Start with a Bashful Blue card base and add a panel of Not Quite Navy.
  2. Stamp the sentiment from the Nursery Necessities stamp set in Not Quite Navy on Whisper White.
  3. Using the 1/16" Circle Punch punch a hole and insert Genuine Brad.  Adhere to card.
  4. Stamp the sailboat from the Nursery necessities stamp set using Not Quite Navy, Certainly Celery and Bashful Blue Stampin' Write Markers on Whisper White.  Mat onto Not Quite Navy and then Bashful Blue.  Adhere to card.
INGREDIENTS:


  • STAMPS: Nursery Necessities
  • INK: Not Quite Navy, Certainly Celery and Bashful Blue Stampin' Write Markers
  • PAPER: Not Quite Navy, Bashful Blue, Whisper White
  • ACCESSORIES: Genuine Brad
  • TOOLS: 1/16" Circle Punch

Have a great day and I hope to see you back again soon!
Hugs,

Wednesday, April 14, 2010

Fox & Friends Baby

Hey there stampers! Hope you are having a great day!

Today's card is another from my Brides and Babies class.  We made a boy card, a girl card and a gender neutral card.  This is the gender neutral one :)


STEPS:


  1. Start with a Kraft card base and add a panel of Certainly Celery and So Saffron.
  2. Stamp the Fox & Friends animals on Very Vanilla in Certainly Celery, Bashful Blue, So Saffron and Close to Cocoa and punch with the 1 3/8" Circle Punch.  Mat onto Kraft punched with the Scallop Circle Punch.  Adhere to card.
  3. Stamp the sentiment from the Celebrate Everything stamp set in Certainly Celery and add to card.
  4. Tie Pumpkin Pie Striped Ribbon around card and tie into a knot.
  5. Punch Real Red card stock with the Heart to Heart Punch and add a heart to the card with a Dimensional.

INGREDIENTS:


  • STAMPS: Fox & Friends, Celebrate Everything
  • INK: Certainly Celery, Bashful Blue, So Saffron and Close to Cocoa
  • PAPER: Very Vanilla, So Saffron, Certainly Celery
  • ACCESSORIES: Pumpkin Pie Striped Ribbon, Dimensional
  • TOOLS: Heart to Heart Punch, 1 3/8" Circle Punch, Scallop Circle Punch

Thanks for stopping by!
Hugs,

Tuesday, April 13, 2010

Flowers & Sparkles

Hey there stampers! Thanks for stopping by today!

Today's card uses a flower from the Pretties Kit, a Sweet Pea Stitched Felt Flower element and the sparkly Sending Love Specialty DSP and absolutely no stamping!! :)


INGREDIENTS:


  • STAMPS: none
  • INK: Pretty in Pink
  • PAPER: Regal Rose, Chocolate Chip, Very Vanilla, Sending Love DSP
  • ACCESSORIES: Chocolate Chip Taffeta Ribbon, Sweet Pea Stitched Felt Flower, Pretties Kit Flower, Tombow Multi Glue, Sponge
  • TOOLS: none

Hope you are having a terrific day!
Hugs,

Monday, April 12, 2010

Super Cute CASE!

Hey there stampers! So glad you stopped by to see me!

Today's card is the last wedding one from my Brides and Babies class. and a total CASE (copy and share everything).  I went surfing through all the great uploads over at Splitcoast Stampers and saw quite a few of these and loved it!  I do not know who was the first to create this but if it was you let me know so I can give you the credit!! :)


INGREDIENTS:


  • STAMPS: Well Scripted
  • INK: Basic Black
  • PAPER: Whisper White, Basic Black, Brushed Silver
  • ACCESSORIES: Half Pearl, Mini Glue Dots, Non-SU Ribbon
  • TOOLS: Big Shot, Scallop Trim Border, Pattern 1 and Pattern 2 Texture Plates, Full Heart Punch


Hugs,

Sunday, April 11, 2010

Brides and Babies Class

Hey there stampers! Thanks for visiting!  Hope you are having a great weekend!

Today's card is another card from my Brides and Babies class.  I used Dazzling Diamonds to make it *sparkly* and Crystal Effects to make the champagne look wet. :)


Here's a close up (a lil blurry sorry!) of the shimmer on the glasses and ring


STEPS:


  1. Stamp the sentiment from the Cheers to You stamp set in Basic Black on Very Vanilla, mat onto Kraft card stock and then onto a Very Vanilla card base.
  2. Using the Crop-a-Dile punch half of a hole in the middle of the folded side of the card and insert very Vanilla Grosgrain Ribbon through and around inside of card and tie into a knot.
  3. Stamp the champagne glasses in Jet Black Stazon and color in with a Barely Banana Stampin' Write Marker on Very Vanilla and mat onto Kraft card stock.  Adhere to card.
  4. Stamp the ring from the Holiday Blitz stamp set 2x on Very Vanilla and punch with the 1" Circle Punch.  Color in with Barely Banana Marker and mat onto Kraft punched with the 1 1/4" Circle Punch.
  5. Add 2-Way Glue to diamonds and add Dazzling Diamonds Glitter tapping excess off.  Adhere to card using Dimensionals.
  6. Add Crystal effects to champagne glasses using a paint brush to spread it around.  Set aside to dry.

INGREDIENTS:


  • STAMPS: Holiday Blitz, Cheers to You
  • INK: Jet Black Stazon, Stampin' Write Markers
  • PAPER: Kraft, Very Vanilla
  • ACCESSORIES: Very Vanilla Grosgrain Ribbon, Crystal Effects, Dazzling Diamonds Glitter, 2-Way Glue Pen,
  • TOOLS: 1" and 1 1/4" Circle Punches, Paint Brush

Thanks for stopping by!
Hugs,

Saturday, April 10, 2010

Thanks A Bunch!

Hey there stampers! I'm on a roll-multiple posts in a week! :)

Today's card is another I made while I had the Sock Monkey stamp set out.  He is awfully cute & silly so I had to pay a little more attention to him before I put him away into the depths of my ginormous and totally full drawer of stamps.


    INGREDIENTS:


    • STAMPS: Itty Bitty Backgrounds, Sock Monkey
    • INK: Jet Black Stazon, Close to Cocoa, Stampin' Write Markers
    • PAPER: So Saffron, Real Red, Basic Black, Whisper White
    • ACCESSORIES: Real Red Striped Ribbon
    • TOOLS:  1 1/4", 1 3/8" and Scallop Circle Punches


    Hugs,

    Friday, April 9, 2010

    Challenge & Sneak Peek in One!

    Hey there stampers! Thanks for stopping by to visit!

    Today's card combines 2 challenges into one and is also a sneak peek at a card we are making at my Brides and Babies class tomorrow!  I thought this was a pretty bridal shower card though it could really go for any occasion.  So this week's challenge at the Cute Card Thursday blog is to be monochromatic using different shades of the same color.  I added white but other than that it's a very pink card!  I also added some glitter to the flowers making it *sparkly* and thus qualifying for the Opus Gluei challenge to make it SPARKLE! :)


    STEPS:


    1. Start with a Pretty in Pink card stock base, punch edge with the Eyelet Border punch and add a strip of Whisper White card stock to the inside edge to show off the pretty border.
    2. Ink the daisy image from the Upsy Daisy stamp set in Pretty in Pink and color the edges of the flowers with a Regal Rose Stampin' Write Marker. Then stamp on Whisper White card stock and notch corners with Ticket Corner Punch.
    3. Stamp the sentiment from the Fresh Cuts stamp set in Regal Rose ink and mat onto Regal Rose card stock.
    4. Wrap Pretty in Pink Striped Ribbon around card and tie into a knot and adhere main panel to card base.
    5. Add a butterfly made with the Big Shot, Beautiful Wings Embosslit and Pretty in Pink card stock using part of a Dimensional.
    6. Add 2-Way Glue to flowers and sprinkle with Dazzling Diamonds Glitter to make it *sparkly*

    INGREDIENTS:


    • STAMPS: Fresh Cuts, Upsy Daisy
    • INK: Regal Rose, Pretty in Pink
    • PAPER: Pretty in Pink, Regal Rose, Whisper White
    • ACCESSORIES: Pretty in Pink Striped Ribbon, Dazzling Diamonds Glitter, 2-Way Glue Pen, Dimensional
    • TOOLS: Eyelet Border Punch, Ticket Corner Punch, Big Shot, Beautiful Wings Embosslit

    Have a great weekend!
    Hugs,

    Thursday, April 8, 2010

    A Color Renovation!

    Hey there stampers! How are you?  Hope you are doing well and are ready for some exciting news!  Stampin' Up announced that they are renovating our core colors.  We are retiring some, adding a few new and bringing back some old colors from previous years!  I am so excited to see Baja Breeze coming back!!


    Here are the colors that are retiring so grab them up if you can't bear to see them go!


    Thanks for stopping by! have a terrific day!

    Hugs,

    Wednesday, April 7, 2010

    Birthday Monkey

    Hey there stampers! Thanks for stopping by to visit!  Be sure to leave me a comment to let me know you've been here!

    Today's card is one I made using left over card guts from a workshop I did last year!  I changed up the stamp set and think it turned out pretty cute.  Best part is I used the Sock Monkey stamp set which was feeling a little sad since I hadn't touched it in a while!


    INGREDIENTS:


    • STAMPS: Heard from the Heart, Starring You, Sock Monkey
    • INK: Jet Black Stazon, Stampin' Write Markers, Bashful Blue
    • PAPER: Basic Black, Bashful Blue, Whisper White, So Saffron
    • ACCESSORIES: Dimensionals
    • TOOLS: Scallop, 1 1/4" and 1 3/8" Circle Punches

    Have a super day!
    Hugs,

    Tuesday, April 6, 2010

    Happy Easter a Few Days Late!

    Hey there stampers!  How are you?  So glad you stopped by today!  I know I've been MIA-we went camping for the Easter weekend and had a great time.  Now it's a mountain of laundry to do!  I meant to post this for Easter but it didn't post so here it is a few days late!

    Today's project uses a few different stamp sets all in the Easter theme.  I covered some peppermint patties and put them in a pretzel bag and tied it with a pretty bow :)  This also qualifies for the Cute Card Thursday challenge of the week "So Egg-Citing!"


    INGREDIENTS:


    • STAMPS: Forest Friends, All Holidays, A Good Egg, A Flower for All Seasons
    • INK: Going gray, Jet Black Stazon, Stampin' Write Markers,
    • PAPER: Pretty in Pink, Gable Green, Almost Amethyst, Barely Banana
    • ACCESSORIES: Pretzel Bag, Peppermint Patties, Pretty in Pink Striped Ribbon
    • TOOLS: 1 1/4", 1 3/8" and Scallop Circle Punches

    Hope you are having a great day!
    Hugs,

    Tuesday, March 30, 2010

    Another Diva Challenge Card!

    Hey there stampers!Happy Tuesday to you!

    Today's card is another using the colors from our friends at the Diva Coffee Break Designs blog.  I used the Upsy Daisy stamp set and these colors were perfect!


    STEPS:


    1. Stamp the flower image from the Upsy Daisy stamps set in Pretty in Pink on Whisper White, then move over slightly and stamp again without reinking.  Rub Certainly Celery and Pretty in Pink ink along edges of panel.
    2. Mat onto Close to Cocoa card stock distresses with your finger nail.  Die cut Pretty in Pink card stock using the Big shot and the Beautiful Wings Embosslit and adhere with a Dimensional.
    3. Punch Pretty in Pink card stock with the Scallop Trim Border Punch from the Sale-A-Bration catalog and adhere onto a Whisper White card base.
    4. Add a strip of Certainly Celery card stock distressed with your finger nail.  Add main panel.
    5. Stamp sentiment in Close to Cocoa ink.

    INGREDIENTS:


    • STAMPS: Upsy Daisy
    • INK: Pretty in Pink, Close to Cocoa, Certainly Celery
    • PAPER: Pretty in Pink, Close to Cocoa, Certainly Celery
    • ACCESSORIES: Dimensionals
    • TOOLS: Beautiful Wings Embosslit, Big Shot, Scallop Trim Border Punch.

    Dont' forget tomorrow is the LAST DAY to get any Sale-A-Bration items free with a $50 purchase!  Don't miss out!
    Hugs,

    Sunday, March 28, 2010

    1 Card 3 Challenges!

    Hey there stampers! Hope you are having a terrific weekend!  It's been a busy one for us.  I had a garage sale yesterday that pretty much consumed my day but was fun and today we are packing up our trailer for our first camping trip of the season next weekend.  We are praying that we have great weather so we can enjoy the boat and beach!

    Today's card combines 3 challenges!  First I used the challenge colors of the week brought to us by the ladies at the Diva Coffee Break Designs blog to use Pretty in Pink, Close to Cocoa and Certainly Celery.  Next I used the Mojo Monday sketch of the week and finally I made a fun dimensional flower using the Extra Large Fancy Flower Punch to qualify for the Cute Card Thursday challenge to make it dimensional!


    STEPS:


    1. Start with a Certainly Celery card stock base and run it through the Big Shot with the Perfect Polka Dots Embossing folder.
    2. Stamp the large image from the Fresh Cuts stamp set in Certainly Celery on Whisper White and mat onto Pretty in Pink.  Adhere to card.
    3. Add some Certainly Celery Grosgrain Ribbon around card hiding the ends under where you will add the flower later.
    4. Die cut Certainly Celery and Close to Cocoa card stock using the Big Shot and the Little Leaves Sizzlit.  Spritz the Certainly Celery leaves using the Certainly Celery Stampin' Write Marker and the Color Spritzer Tool to add some interest.  Adhere to card using the 2-Way Glue Pen (easier to apply to little stem areas than SNAIL)
    5. Punch Pretty in Pink card stock with the Extra Large Fancy Flower Punch 3 times and crumple up and unfold.  Sponge edges with Pretty in Pink ink.  Add a pink brad to the center and adhere to card using Dimensionals.

    INGREDIENTS:


    • STAMPS: Fresh Cuts
    • INK: Certainly Celery, Pretty in Pink
    • PAPER: Pretty in Pink, Certainly Celery, Whisper White, Close to Cocoa
    • ACCESSORIES: Certainly Celery Grosgrain Ribbon, Dimensionals, Brad
    • TOOLS: Paper Piercer, Extra Large Fancy Flower Punch, Big Shot, Perfect Polka Dots Embossing Folder, Little Leaves Sizzlit.


    Hugs,

    Friday, March 26, 2010

    Workshop Card

    Hey there stampers! I'm so glad you stopped by to visit me today!
    Today's card is one I did at my last workshop.  It's very similar to one I posted a few days ago but I added a 2nd bird and love the way it turned out.


    STEPS:


    1. Start with an Apricot Appeal card stock base and wheel Bella's Border in the same color ink on the top and bottom of your card.
    2. Stamp the vine image from the Vintage Vogue stamp set in Certainly Celery all over two of the Whisper White squares and top and bottom of one.  Stamp the flower from the same stamp set in Ballet Blue ink on a Whisper white square.  Clean off stamp and stamp again using Apricot Appeal ink and punch with the 3/4" Circle Punch.  Adhere to flower using a Dimensional.
    3. Punch Ballet Blue, Bashful Blue and Certainly Celery card stock with the 2-Step Bird Punch.  Add the opposite color blue wing to each bird with a Dimensional.  Use the 2-Way glue pen to add the Certainly Celery branch.
    4. Stamp the sentiment from the Whimsical Words stamp set in Basic Black and adhere the Whisper White squares to a mat of Certainly Celery and then onto your card base.

    INGREDIENTS:


    • STAMPS: Whimsical Words, Vintage Vogue, Bella's Border Standard Wheel
    • INK: Certainly Celery, Apricot Appeal, Basic Black, Ballet Blue
    • PAPER: Certainly Celery, Apricot Appeal, Bashful Blue, Ballet Blue, Whisper White
    • ACCESSORIES: Dimensionals, 2-Way Glue Pen
    • TOOLS: 3/4" Circle Punch, 2-Step Bird Punch 

    Hope you have a great day and that you come back again soon!
    Hugs,