Sunday, February 28, 2010

Birthday Bliss!

Hey there stampers! Hope you are having a great weekend!  Yesterday I had my fabulous group of friends come over to stamp at my Birthday Stamp Camp.  It was such fun!
Today's card is one we made.  It's CASED from the super talented Amy Celona.  You can see hers HERE.


STEPS:


  1. Wheel the Whimsy Jumbo Wheel in on Very Vanilla card stock using Real red ink.  Add to card base of Real Red card stock.
  2. Punch the top and bottom of a piece of Pretty in Pink using the Scallop Trim Border Punch (FREE in the SALE-A-BRATION catalog with a $50 purchase!) adhere to card.
  3. Punch Sending Love Specialty DSP with the 1 1/4" Square Punch and layer onto Kraft card stock punched with the 1 3/8" Square Punch.  Add a little piece of gift tissue and two pieces of Hemp Twine for the handles with Mini Glue Dots.  Adhere 2 of the gift bags flat to the card and the third with a Dimensional.
  4. Stamp the sentiment from the Birthday Bliss stamp set in Real Red on Very Vanilla card stock and punch with the Wide Oval Punch.  Add 2 pieces of Real Red card stock punched with the Scallop Oval Punch tot he back of the wide oval sentiment and adhere to card with Dimensionals.


INGREDIENTS:


  • STAMPS: Birthday Bliss, Whimsy Jumbo Wheel
  • INK: Real Red
  • PAPER: Sending Love Specialty DSP, Pretty in Pink, Real Red, Very Vanilla
  • ACCESSORIES: Dimensionals, Mini Glue Dots, Hemp Twine, Gift Tissue Paper
  • TOOLS: Scallop Trim Border, 1 1/4" Square, 1 3/8" Square, Wide Oval and Scallop Oval Punches

So what do you think?  I just love the gift bag idea-I'd love to hear from you so leave me a comment! :)
Hugs,

Friday, February 26, 2010

You are One of a Kind

Hey there stampers! Thanks for checking in with me today!
Today's card is yet another card from my work's silent auction.  I am too crazy busy right now to stamp except for my upcoming stamp camp prep but I don't want my ladies to see everything before they get here on Saturday!  So this will have to do :)


STEPS:


  1. Stamp dogs from All in the Family stamp set in Jet Black Stazon and color in with Stampin' Write Markers.
  2. Add to a panel of going Gray card stock and then onto your card base of whisper White card stock.
  3. Add a strip of DSP and the sentiment from the One of a Kind stamp set stamped in Basic Black.


INGREDIENTS:


  • STAMPS: All in the Family, One of a Kind
  • INK: Stampin' Write Markers, Jet Black Stazon
  • PAPER: Going Gray, Whisper White, DSP


Hope you are having a great day TGIF!
Hugs,

Thursday, February 25, 2010

D is for Dog Thank You

Hey there stampers! Thanks for stopping by!  It's been a beyond crazy week for me so I am digging into my photo archives to post something.   is another from my work's silent auction fundraiser.
Today's card is another from my work's silent auction fundraiser-it was last weekend and a lot of fun!


STEPS:


  1. Stamp the dog image from D is for Dog stamp set in Basic Black on Whisper White.  Add a Fire Circle Rhinestone Brad to collar and mat onto basic Black card stock.
  2. Add to Rich Razzleberry card stock then onto another panel of Basic Black and finally onto a card base of Rich Razzleberry.
  3. Stamp the paw print in Basic Black ink on Whisper White and punch with the 3/4" Circle Punch.  Add to rich razzleberry punched with the 1" circle Punch and finally onto Basic Black punched with the 1 1 /4" Circle Punch and adhere to card with Dimensional.
  4. Stamp the sentiment from the All Holidays stamp set in Basic Black on Whisper White and punch with the Word Window Punch.  Adhere to card.

INGREDIENTS:


  • STAMPS: All Holidays, D is for Dog
  • INK: Basci Black
  • PAPER: Rich Razzleberry, Whisper White, Basic Black
  • ACCESSORIES: Fire Circle Rhinestone Brad, Dimensionals
  • TOOLS: Word Window, 3/4", 1" and 1 1/4" Circle Punches

Have a great day!
Hugs,

Wednesday, February 24, 2010

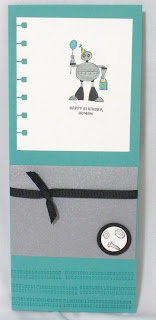
Happy Birthday Human!

Hey there stampers! Hope you are having a great day!
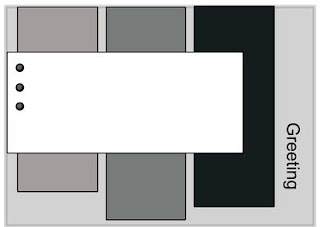
Today's card is one I saw on SplitCoast Stampers done by marylovestostamp and thought it was a great card for a boy!  You can see hers HERE. I am still playing around with it and might use it for one of the cards we are making at my upcoming birthday stamp camp.


STEPS:


  1. Stamp the robot from the Lots of Bots stamp set in Jet Black Stazon ink and color in with Stampin' Write Markers.  Punch side of your Whisper White piece with the Spiral Punch.
  2. Adhere Whisper White panel to your card base of Bermuda Bay.
  3. Add a panel of Brushed Silver card stock with Black Grosgrain Ribbon knotted around to your card base.
  4. Stamp the numbers from the same stamp set in Bermuda Bay aloong the bottom of your card.  I probably should have used the Stamp-A-Ma-Jig since you can see they are not all that straight!
  5. Stamp the nuts and bolts in Jet Black Stazon and punch with the 3/4" Circle Punch.  Mat onto Basic Black punched with teh 1" Circle Punch.  Adhere to card with a Dimensional.


INGREDIENTS:


  • STAMPS: Lots of Bots
  • INK: Bermuda Bay, Jet Black Stazon, Stampin' Write Markers
  • PAPER: Bermuda Bay, Whisper White, Basic Black, Brushed Silver
  • ACCESSORIES: Black Grograin Ribbon
  • TOOLS: Spiral, 3/4" Circle and 1" Circle Punches

So what do you think?  I'd love to hear!
Hugs,

Tuesday, February 23, 2010

Heather's Sketch Challenge

Hey there stampers! So glad you stopped by!
Today's card is one I made following a sketch that Heather Summers posted a couple days ago.  It was intriguing and I think mine turned out pretty cute.  I used some of the yummy Sending Love Specialty DSP and the Beautiful Wings Embosslit.


STEPS:


  1. Stamp your greeting from the Flight of the Butterfly stamp set in Chocolate Chip of Pretty in Pink card stock.
  2. Adhere your panels of Sending Love Specialty DSP matted with Chocolate Chip card stock onto your card base.  Be sure to add your Choclate Chip Brads on your top panel before adhering it to your card.
  3. Stamp the butterfly from the Flight of the Butterfly stamp set first the polka dotted one in Pretty in Pink and then stamp over that with the outline in Chocolate Chip ink.  Cutout with scissors and adhere to Pretty in Pink card stock punched with the Butterfly punch.  Adhere to main panel with a Dimensional.
  4. Die cut Chocolate chip card stock with the Beautiful Wings Embosslit.  Adhere to main panel with pieces of Dimensional.


INGREDIENTS:


  • STAMPS: Flight of the Butterfly
  • INK: Pretty in Pink, Chocolate Chip
  • PAPER: Chocolate Chip, Sending Love Specialty DSP, Pretty in Pink 
  • ACCESSORIES: Chocolate Chip Brads, Dimensionals
  • TOOLS: Butterfly Punch, Paper Piercer and Mat Pack, Beautiful Wings Embosslit, Big Shot


Hugs,

Monday, February 22, 2010

Another Stamp Camp Peek

Hey there stampers! Thanks for joining me today!  This week is going to be a crazy one for me so hopefully I'll be able to post something most days!
Today's card is another we are doing this Saturday at my Birthday Stamp Camp.  It uses the ultra sweet Fox & Friends stamp set from the Occasions Mini.


STEPS:


  1. Stamp the whale from Fox & Friends stamp set in Ballet Blue, the monkey in Close to Cocoa and the turtle in Certainly Celery all on Whisper White and punch with the 1 3/8" Circle Punch.  Adhere onto a square of Tall Tales DSP using Dimensionals.
  2. Stamp the sentiment from the Starring You stamp set in Pumpkin Pie and punch with the 1 3/8" Circle Punch.  Add to card.
  3. Adhere the DSP with the circles to a panel of Kraft card stock and tie some Pumpkin Pie Striped Ribbon around it and tie into a knot.  Adhere onto a Whisper White card stock base.


INGREDIENTS:


  • STAMPS: Starring You, Fox & Friends
  • INK: Close to Cocoa, Pumpkin Pie, Ballet Blue, Certainly Celery
  • PAPER: Tall Tales DSP, Whisper White, Kraft
  • ACCESSORIES: Pumpkin Pie Striped Ribbon
  • TOOLS:  1 3/8" Circle Punch

Have a great day!
Hugs,

Sunday, February 21, 2010

Purrrrrfect!

Hey there stampers! Thanks for visiting today!  Hope you are enjoying your weekend!
Today's card is another using the Pun Fun stamp set.  I stamped a bunch and embossed them all and had these on my desk waiting to be used and this is what I came up with. :)


STEPS:


  1. Stamp the cat from the Pun Fun stamp set in Versamark ink and sprinkle with Black Embossing Powder.  Tap off excess over Powder Pal and heat set with Heat Tool.  Cut out cats after coloring them with Stampin' Write Markers.
  2. Adhere cats to squares of Whisper White card stock and add shadow underneath using the Sahara Sand Stampin' Write Marker.  Trim the sentiment and adhere to last Whisper White square.  Adhere squares to your Kraft card stock card base.
  3. Add a strip of Whisper White card stock to bottom of your card and add 2 brads using the Paper Piercer and Mat Pack.
  4. Stamp the paw print from D is for Dog in Basic Black on Whisper White and punch with the 1" Circle Punch.  Add to Kraft card stock punched with the 1 1/4" Circle Punch.  Adhere to square using a Dimensional.


INGREDIENTS:


  • STAMPS: D is for Dog, Pun Fun
  • INK: Versamark, Basic Black, Stampin' Write Markers
  • PAPER: Kraft, Whisper White
  • ACCESSORIES: Brown Brads, Dimensionals
  • TOOLS: 1" and 1 1/4" Circle Punches, Paper Piercer, Mat Pack, Heat Tool, Embossing Buddy, Powder Pal. 

Have a great day and hope to see you again soon!
Hugs,

Saturday, February 20, 2010

Birthday Stamp Camp Sneak Peak

Hey there stampers! Thanks for stopping by!
Today's card is a sneak peak from my upcoming Birthday Stamp Camp and a total CASE (copy and share everything)from the Stampin' Success magazine-an exclusive publication for demonstrators.  I did change the colors but other than that it's about the same!  Thanks SU!


STEPS:


  1. Start with a Whisper White card stock base.  Add a panel of Kraft card stock with a panel of Thoroughly Modern DSP and Bermuda Bay Polka Dot Ribbon tied in a knot.
  2. Emboss a piece of Rich Razzleberry card stock using the Big Shot and the Elegant Bouquet Embossing folder.  Add to card.
  3. Using the 2 step Bird Punch punch out the bird in Bermuda Bay and Kraft card stock and the branch in Old Olive card stock.  Adhere to Rich Razzleberry panel using a Dimensional for the bird's wing.
  4. Stamp the sentiment from the Starring You stamp set in Basic Black on Whisper White card stock and punch with the Word Window Punch.  Adhere to card with Dimensionals.


INGREDIENTS:


  • STAMPS: Starring You
  • INK: Basic Black
  • PAPER: Rich Razzleberry, Bermuda Bay, Kraft, Thoroughly Modern DSP
  • ACCESSORIES: Bermuda Bay Polka Dot Ribbon, Dimensionals
  • TOOLS: 2 Step Bird Punch, Big Shot, Elegant Bouquet Embossing Folder, Word Window Punch 


Hugs,

Friday, February 19, 2010

3 Challenges in 1 Card!

Hey there stampers! Thanks for stopping by!

Today's card incorporates three challenges in one!  I used the colors from this week's Color Throw Down, Karen's awesome Sweet Sunday Sketch and the stamp set I used has an Asian flair to it to go with the Opus Gluei Challenge of the week- Asian Motivation!  Woo Hoo!


STEPS:


  1. Stamp the bamboo image from the Mebrace Life stamp set in Bravo Burgundy and color in with a Sage Shadow Stampin' Write Marker.  Punch with the 1 1/4" Square Punch and layer onto Really Rust punched with the 1 3/8" Square Punch.
  2. Adhere squares onto a 4x4 square of Bravo Burgundy card stock and then onto your card base of Sage Shadow card stock.
  3. Stamp the flower image in Bravo Burgundy and color in with the same color with a Blender Pen.  Add a little really Rust ink to the center with a Blender Pen and add a Rhinestone Brad.  Adhere to card with Dimensionals.

INGREDIENTS:


  • STAMPS: Embrace Life
  • INK: Bravo Burgundy, Really Rust, Stampin' Write Marker in Sage Shadow
  • PAPER: Whisper White, Sage Shadow, Bravo Burgundy, Really Rust.
  • ACCESSORIES: Circle Rhinestone Brad, Dimensionals
  • TOOLS: 1 1/4" and 1 3/8" Square Punches

Thanks for stopping in-leave a comment so I know you've been here!
Hugs,

Thursday, February 18, 2010

Items from HOLIDAY MINI Still Available NOW!

Hey there stampers!  Just a quick note to let you know that many of the fabulous items from the HOLIDAY MINI CATALOG that ended Jan. 4th are still available for a limited time!  So if you missed out on that awesome Ornament Punch or the Pop Up Christmas Tree Die grabbed them now!

Item # Description Price


116794 Ornament punch $15.95

116806 Champagne Mist Shimmer Paint $5.95

116854 Frost White Shimmer Paint $5.95

116807 Platinum Shimmer Paint $5.95

116829 Décor Elements Blocks $9.95

116824 Stampin' Up! Textured Impressions Folder Petals-A-Plenty $7.95

116821 Stampin' Up! Holiday Windows Magnetic Movers & Shapers $29.95

116819 Stampin' Up! Table Setting Bigz XL die $42.95

116820 Stampin' Up! Embosslits Merry die $11.95

116823 Stampin' Up! Sizzlits Merry Details die $5.50

116822 Stampin' Up! O Christmas Tree Pop-Up Bigz XL die $42.95

118140 Stampin' Up! Tree Decorations Sizzlits die $5.50

118108 My Digital Studio $79.95

116519 Charming stamp set $19.95


To order online click the "Shop Now" button at the top right of my blog!  Or email me HERE
Thanks for stopping by and supporting my blog!
Hugs,

Diva Coffee Break Designs Sketch Challenge

Hey there stampers! I'm so glad you stopped by to visit!  Hope you are having a terrific day!
Today's card is my submission for the Diva Coffee Break Designs Sketch challenge for the week.  As you can see I've had the Pun Fun stamp set on my desk for the last couple of days.  I'd been neglecting these cute lil stamps so I made sure to use them a lot this week. :)


STEPS:


  1. Using the It's Beautiful Jumbo Wheel, stamp Sahara Sand card stock with Sahara Sand ink. Add to a Whisper White card stock base.
  2. Add a strip of Thoroughly Modern DSP across your card.  Add a square of Rich Razzleberry card stock and Sahara Sand punched with the 1 3/8" Square Punch layered on top.
  3. Stamp the skunk image from the Pun Fun stamp set in Versamark ink, sprinkle Black Embossing Powder over it, tap off excess over the Powder Pal tray and heat set with the Heat Tool.  Punch out sentiment with the Word Window Punch and cut out skunk with scissors.
  4. Add skunk to card with Dimensionals.  Adhere sentiment onto Bermuda Bay card stock punched with the Modern Label Punch.  Add Black Brads using the Paper Piercer and add to card with Dimensionals.


INGREDIENTS:


  • STAMPS: It's Beautiful Jumbo Wheel, Pun Fun
  • INK: Sahara Sand, Versamark
  • PAPER: Rich Razzleberry, Thoroughly Modern DSP, Sahara Sand, Whisper White
  • ACCESSORIES: Black Brads, Black Embossing Powder, Dimensionals
  • TOOLS: 1 3/8" Square, Word Window and Modern Label Punches, Powder Pal, Heat Tool, Embossing Buddy 

Thanks for stopping by and hope to see you here again soon!
Hugs,

Wednesday, February 17, 2010

Thank Ewe!

Hey there stampers! Thanks for stopping by!

Today's card is one I made to give to a friend and customer that surprised me with an awesome explosion box and box of chocolates as a birthday gift.  She is so sweet to think of me!


STEPS:


  1. Stamp the sheep image from the Pun Fun stamp set in Versamark ink, sprinkle with Black Embossing Powder and heat set with Heat Tool.  Color and cut out.
  2. Add a panel of Real Red card stock to a Whisper White card base.  Add a panel of Basic Black punched with the Scallop Trim Punch from the Sale-A-Bration catalog.
  3. Add a strip of Sending Love Specialty DSP and two Black Brads.  Add the sheep with Dimensionals to the card.
  4. Stamp the sentiment on Whisper White in Basic Black.  Punch out with the Word Window and adhere to card.  Add heart from the Heart to Heart punch.

INGREDIENTS:


  • STAMPS: Pun Fun
  • INK: Basic Black, Versamark, Stampin' Write Markers
  • PAPER: Basic Black, Whisper White, Real Red
  • ACCESSORIES: Black Brads, Dimensionals
  • TOOLS: Scallop Trim Punch, Paper Piercer, Embossing Buddy, Powder Pal, Heat Tool, Word Window Punch 


Hugs,

Tuesday, February 16, 2010

Stamping 411

Hey there stampers! Happy Tuesday!
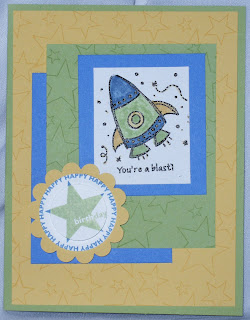
Today's card is my submission for Stamping 411's challenge for the week to use Brocade Blue, Certainly Celery and So Saffron.


STEPS:


  1. Stamp the space ship from the Pun Fun stamp set in Versamark ink on Whisper White card stock and sprinkle with Black Embossing Powder.  Heat set with the Heat Tool and color in with Stampin' Write Markers.  Mat onto Brocade Blue.
  2. Stamp the star image from Starrring You in So Saffron on So Saffron card stock and in Certainly Celery on Certainly Celery card stock.  Mat the So Saffron panel onto Certainly Celery card stock card base.
  3. Add the focal image onto the Certainly Celery panel and then to a panel of Brocade Blue and then onto the So Saffron piece.
  4. Stamp the star image twice on Whisper White card stock once in Brocade Blue and once in Certainly Celery.  Punch the the Brocade Blue stamped piece with the 1 3/8" Circle Punch and the Certainly Celery one with the 1" Circle Punch.  Layer together with a Dimensional and add to So Saffron punched with the Scallop Circle Punch.  Add to card.


INGREDIENTS:


  • STAMPS: Starring You, Pun Fun
  • INK: Certainly Celery, So Saffron, Versamark
  • PAPER: Certainly Celery, Brocade Blue, So Saffron, Whisper White
  • ACCESSORIES: Black Embossing Powder, Dimensional
  • TOOLS: 1 3/8" and 1" Circle Punches, Heat Tool, Powder Pal, Embossing Buddy 


Hugs,

Sunday, February 14, 2010

Happy Valentine's Day!

Hey there stampers! Happy Valentine's Day!
Today's project is a little gift I put together for a friend for Valentine's Day.


Here's a close up of the card

STEPS:


  1. For the card, stamp the coffe cup image from the Pun Fun stamp set in Versamark ink and sprinkle Black Embossing Powder over it.  tap off excess and heat set with the Heat Tool.
  2. Punch out with the 1 3/4" circle Punch and color in with Stampin' Write Markers (real red and creamy caramel).
  3. Using the Mat Pack and Paper Piercer pierce corners of a piece of Real Red card stock.  Adhere to Whisper White card base measuring 3x6 and folded in half.
  4. Adhere coffee cup image with a dimensional.


INGREDIENTS:


  • STAMPS: Pun Fun
  • INK: Versamark
  • PAPER: Real Red, Whisper White
  • ACCESSORIES: Dimensional
  • TOOLS: Mat Pack, Paper piercer, Embossing Powder, Embossing Buddy, Powder Pal, Heat Tool, 1 3/4" Circle Punch
Hope you are having a terrific day!

Hugs,

Thursday, February 11, 2010

Fancy Favor Valentine

Hey there stampers! Thanks for stopping by to see me today!
Today's project is one I made over 30 of for a friend's daughter's birthday coming up this weekend.  They were so cute that I made a few for my family too.  I used some retired DSP on mine-always trying to trim down that stash!  It also qualifies for Cute Card Thursday's challenge of the week-Valentine's.  Not that that is much of a challenge really ;)


STEPS:


  1. Die cut Regal Rose card stock using the Big Shot and the Fancy Favor Die.  Fold all the creases except the gussets.
  2. Add two panels of DSP-I used some retired DSP from my stash-measuring 3x2 3/4.
  3. Fold up the bottom flap and insert the Full Heart Punch on one of the front panels and punch through both the card stock and DSP. Save the DSP heart you punched out for later.
  4. Add the Heart Treat Cup to the box by adding the smallest bit of adhesive around the heart you punched out and inserting the cup.  Fill with candy-I used Nerds-and cover with a 3x 2 3/4 panel of Regal Rose card stock punched with a 1" Circle Punch towards the bottom.  Add another heart of DSP punched with the Full Heart Punch over the hole.  I used Tombo Multi adhesive around the edges of the DSP heart and waited a few minutes to make it removable.  This way the recipient can just peel the heart from the inside to get their candy without tearing apart the box! :)
  5. Put the Fancy Favor Box together using Sticky Strip and add the DSP heart you saved from earlier to the bottom to cover up the notch made in the bottom flap when you punched the Full Heart in step 3.
  6. Add a handle made from a 1 x11 piece of Reagal Rose and a 3/4 x11 piece of DSP to the box using Brads and the 1/16" Circle Punch.  The box will be a little front heavy with the Heart Treat Cup but will be fine when you add your goodies inside.

INGREDIENTS:


  • STAMPS: none
  • INK: none
  • PAPER: Regal Rose, retired DSP
  • ACCESSORIES: Brads, Non-SU Ribbon, Nerds Candy, Heart Treat Cup, Tombo, Sticky Strip
  • TOOLS: Full Heart, 1" Circle, 1/16" Circle Punches, Fancy Favor Die, Big Shot 

Hope you have a terrific day and to see you here again soon!
Hugs,

Wednesday, February 10, 2010

Love Bug

Hey there stampers! How are you? Thanks for stopping by to see me today!

Today's card Is one I made for a friend.  She bought my retired Ladybug Wheel and wanted me to make a few cards for her family for Valentine's Day since she didn't think she'dhave time to do it herself.


STEPS:


  1. Roll the retired Ladybugs Wheel in Basic Black and then onto your card base of Pixie Pink at the top and bottom, reinking in between.
  2. Stamp "love bug" from the Love Bug Hostess Level 1 Stamp set using a Basic Black Stampin' Write Marker to omit the "s" and Whisper White card stock.
  3. Punch Basic Black card stock using the 1" Circle Punch, the Heart to Heart Punch and the 1 1/4 " Circle Punch.  Add to Pixie Pink card stock die cut with the Heart Embosslit and cut in half.
  4. Add to matted Whisper White piece with Dimensionals after adding 2 strips of basic Black card stock twirled on the end of a paint brush. 

INGREDIENTS:


  • STAMPS: Love Bug
  • INK: Basic Black
  • PAPER: Pixie Pink, Basic Black, Whisper White
  • ACCESSORIES: Paint Brush, Retired Ladybugs Wheel, Mini Glue Dots, Dimensionals
  • TOOLS: 1" Circle, 1 1/4" Circle and Heart to Heart Punches, Heart Embosslit 


Hugs,

Tuesday, February 9, 2010

RAK

Hey there stampers! Thanks for visitng my blog today!
Today's card is one I got from the winner of my most recent blog candy.  Joyce AKA Stamper Joyce sent me this card back using the stamp set that she won!Isn't that sweet of her?!  She also used the silk flower from the Pretties Kit, some Rich Razzleberry Polka Dot Ribbon and the butterfly from the new Beautiful Wings Embosslit.


Have a great day and hope to see you again tomorrow!

Hugs,

Monday, February 8, 2010

It Was My Birthday Yesterday!

Hey there stampers!  Thanks for stopping by! Sorry I didn't post anything yesterday-my whole family has been sooo sick! I am coughing my brains out and have a Nyquil hangover-that stuff is potent! 
Today's card is one I got from my fabulous upline, Janelle Lavelle-she never forgets me! :)  She used the Party Hearty stamp set and the Rock N Roll technique and also Melon Mambo card stock and Razzleberry Lemonade DSP.  It is so cute and cheery!  Thanks Janelle!


Have a terrific day and pray that I get better soon!
Hugs,

Saturday, February 6, 2010

Something's Fishy

Hey there stampers! Thanks for checking in with me this weekend!  It's a lazy Saturday over here at the Fortuna house mostly because we are all sick with a head cold and feel miserable!  Not exactly what I had planned for my birthday weekend! blah!
Today's card is one more from the stack I made for my work's silent auction.  The picture is terrible-it does not look all blotchy and faded in person really!


STEPS:


  1. Stamp the cat from the C is For Cat stamp set in Basic Black on Whisper White and mat onto Real Red and then Basic Black card stock.
  2. Stamp the fish image from the same set in Basic Black on the sides of your Whisper white card base and add the kitty panel.
  3. Stamp the paw print in Basic Black and punch out with the 3/4" Circle Punch and mat on Basic Black punched with the 1" Circle Punch.  Add to card with Dimensionals.


INGREDIENTS:


  • STAMPS: C is for Cat
  • INK: Basic Black
  • PAPER: Basic Black, Real Red, Whisper White
  • ACCESSORIES: Dimensionals
  • TOOLS: 3/4" and 1" Circle Punches

Have a great day!
Hugs,

Thursday, February 4, 2010

Very Turtle-y Thank You!

Hey there stampers! Thanks for stopping by!
Today's card is one I made while making a bunch with this image a few weeks ago.  I used some card guts left over from my Valentine's stamp camp so it came together quickly!


STEPS:


  1. Stamp the heart trio image from the I (Heart) Hearts stamp set in Close to Cocoa on Kraft card stock.
  2. Stamp the turtle image from the Very Thankful stamp set in Jet Black Stazon Ink and color in with Stampin' Write Markers.  Notch out corners with the Ticket Corner Punch and mat onto a piece of Close to Cocoa card stock also punched with the Ticket Corner Punch.
  3. Take a scrap of Real Red and punch with the Heart to Heart Punch.  Add the smallest hearts to your card along with a Kraft Corderoy Button laced with Hemp Twine with a Mini Glue Dot.
  4. Add some Chocolate Chip Grograin Ribbon tied into a knot. 


INGREDIENTS:


  • STAMPS: I (Heart) Hearts, Very Thankful
  • INK: Close to Cocoa, Jet Black Stazon, Stampin' Write Markers
  • PAPER: Kraft, Close to Cocoa, Whisper White
  • ACCESSORIES: Chocolate Chip Grosgrain Ribbon
  • TOOLS: Ticket Corner Punch

Have a great day!
Hugs,

Wednesday, February 3, 2010

Hey there stampers! Thanks for stopping by to visit!
Today's card is a recycled one!  My beloved upline, Janelle, sent me a card and some goodies from Leadership and I just had to re use it!  I simply trimmed down the Soft Suede piece (which was her card base)matted it onto Whisper White and then onto a card base of Rich Razzleberry card stock.  Voila! A new and "green" card!


Have a great day and we'll see you again tomorrow!


Hugs,

Tuesday, February 2, 2010

Birthdays are for the Dogs!

Hey there stampers! Thanks for stopping by to check out my card for the day!
Today's card is yet another I made for my work's silent auction coming up on the 20th.  It was fun to color all the doggies in!


STEPS:


  1. Stamp the dog image from All in the Family in Jet black Stazon in on Whisper White card stock and color in with Stampin' Write Markers.
  2. Stamp the party hat from the Party Hearty stamp set in Real Red, cut out with scissors and adhere to dog's head.
  3. Mat onto a panel of Going Gray and then onto your Whisper White card stock base.
  4. Stamp the sentiment from All Holidays in Jet Black Stazon on Whisper White card stock and mat onto Going Gray.  Adhere to card.


INGREDIENTS:


  • STAMPS: All Holidays, All in the Family, Party Hearty
  • INK: Stampin' Write Markers, Real Red, Jet Black Stazon
  • PAPER: Whisper White, Going Gray

Have a super day!

Hugs,

Monday, February 1, 2010

Gift Certificates Available NOW!

Hey there stampers! How are you?  Hope you are doing well!
So with Valentine's Day just a couple weeks away I am sure many of you are looking for the perfect gift for that stamping friend or loved one or maybe you'd like a gift of fun stampin' stuff for yourself!  Here's the perfect gift!  A Stampin' Gift Certificate!  These are available in any denomination only through me, Elizabeth Fortuna, good for Stampin' Up product of your choice!

I can mail it directly to the recipient or to you whichever you prefer!  Email me now to get yours in time for Valentine's Day!


Hugs,