Wednesday, December 30, 2009

FREE Stamp Pad!


Hey there stampers! How are you?  Can you believe 2009 is almost gone?  Where do the days go?!?

Today I am offering a special only through me, Elizabeth Fortuna :)  If you place an order either online or through me of $50 or more (before tax and shipping) you can choose a FREE Classic Stamp Pad in your choice of color!  This offer is for a limited time so hurry!  Don't forget to check out the Clearance Rack and the Holiday Mini Catalog (ends Jan 4th!).  If you order Jan. 5th or later you qualify for a FREE SALE-A-BRATION item as well! (I'll have a link to it when it goes live!) When I receive confirmation of your order I will email you to find out what color you'd like your free stamp pad to be.  Sound good?

Click HERE to go to my online store or email me with your order at for2nately@aol.com

Don't forget to check out this post for some BLOG CANDY that ends tomorrow!

Hugs,

Tuesday, December 22, 2009

Happy Holidays and BLOG CANDY!!

Hey there stampers! How are you?  Are you ready for the Holidays? I am certainly not-I feel like I have been constantly on the go and haven't completed half of the things I wanted to get done before Christmas! Ugh!  I am not going to be posting anything until sometime next week unless something wonderful happens and I catch up with everything so to make it up to you and to reward you for checking out my blog I am offering up some BLOG CANDY!


My candy consists of  the Note of Thanks Mini Note Kit (super cute!) and a set of Love Notes in Very Vanilla, Purely Pomegranite and Baja Breeze (3x3 note cards with envelopes).  All you have to do to win is become a follower and leave me a comment telling me what you are most thankful for this year!  I'll choose a winner Thursday the 31st..  You must live in the U.S. to win-sorry!

I hope that you have a very happy and safe holiday and that Santa leaves you something very "stamp-endous" under the tree! ;)


Hugs,

Monday, December 21, 2009

Fancy Favor Box

Hey there stampers! Thanks for stopping by!  I know it's been a few days again since I've posted anything so thanks for your patience :) My dad was diagnosed with cancer just before Thanksgiving and I've had much to deal with since.  Luckily I think we have caught it before it spread and he seems to be doing well after his surgery.  Now I have to wait for the pathology results to come back on Thursday before I can really relax.  Anyway on to the fun stuff!!
Today's I have the simplest of projects and all it takes is the Fancy Favor Die, some DSP, ribbon and a tag!


STEPS:


  1. Die cut your DSP (I used some retired DSP here) using the Fancy Favor Die and adhere together with Sticky Strip.
  2. Punch top with the Slot Punch and put ribbon through and tie in knot.
  3. Stamp your sentiment-this one is from the Christmas Punch Hostess Set, punch with the Wide Oval Punch, add Real Red Scallop Circle to the back and adhere with a Pop Up Glue Dot.


INGREDIENTS:


  • STAMPS: Christmas Punch
  • INK: Real Red
  • PAPER: Retired DSP, Very Vanilla, Real Red
  • ACCESSORIES: Red Ribbon (non-SU), Pop-Up Glue Dot
  • TOOLS: Slot Punch, Wide Oval Punch, Scallop Circle Punch, Fancy Favor Die


Hugs,

Thursday, December 17, 2009

Gotta Love Snowman Poop!

Hey there stampers! Can you believe that I haven't abandonned you yet here in blog land?  It wasn't intentional I really do love showing the things I've stamped and created.  Sometimes life just gets in the way!
Today's project is another for my boutique.  Quick, simple and funny!


STEPS:


  1. Fill a Small Cello Bag with mini marshmallows and tape closed.
  2. Wheel the So Swirly Jumbo Wheel in Brilliant Blue on Whisper White to make a topper for your Cello Bag.  Staple onto your bag.
  3. Print wording from your computer and adhere to topper.
  4. Stamp snowman tag from the Christmas Punch Hostess Level 2 Stamp set in Brilliant Blue ink and color in nose with Only Orange Stampin' Write Marker.  Punch with Tag punch, add ribbon and adhere to topper front.


INGREDIENTS:


  • STAMPS: Christmas Punch, So Swirly Jumbo Wheel
  • INK: Brilliant Blue
  • PAPER: Whisper White
  • ACCESSORIES: mini marshmallows, staple, ribbon
  • TOOLS: Tag Punch

Happy Holidays!
Hugs,

Wednesday, December 16, 2009

Wisking You a Merry Christmas!

Hey there stampers! Here's another cute little porject I made for my boutique.


sorry it's a little blurry!

STEPS:


  1. Add candy to a Medium Cell Bag and fit inside the wisk.
  2. Add some holiday greenery and ribbon and tag.


INGREDIENTS:


  • STAMPS: none
  • INK: none
  • PAPER: Real Red, Whisper White
  • ACCESSORIES: candy, Medium Cello Bag, Ribbon
  • TOOLS: Small and Regular Tag Punches

Have a great day and hope to see you back again soon!
Hugs,

Tuesday, December 15, 2009

Magnetic Paper Build-A-Bears

Hey there stampers! Looking for a cute gift for a little girl?  Well look no further!  These are super stinking cute and totally not my idea!  I cannot remember whose blog I saw this on but they are a genius! :)  If it was you please email me so I can give you the credit!!
Today's project uses the Build-A-Bear Dies and the Skinny Metal Tin on sale now at Stampin' Up's Clearance Rack!  Click HERE to check out the deals!


                                                                      Outside of tin


                                                     Inside of tin with magnetic clothes


STEPS:


  1. Cover inside and outside of Skinny Tin with DSP (I used retired DSP-I have TONS!!!) Adhere with Snail.  Decorate front of tin with Die Cut letters (I used Sizzix Lollipop Letters and some more retired DSP) and the bear head from the Seal of Pawthenticity stamped in Close to Cocoa on Whisper White and punched with the 1 1/4" circle Punch and layered on DSP punched with the 1 3/8" Circle Punch.
  2. Die cut Stampin' Up Bear using Whisper White and Creamy Caramel (snout)card stock.  Adhere snout to bear and add Basic Black card stock to back of head to make eyes, nose and mouth.  Adhere to inside of tin.
  3. Die cut outfits in DSP or card stock and decorate as desired.  Add adhesive magnetic strip ($2 for a roll at craft store) to backs of clothing.


INGREDIENTS:


  • STAMPS: Seal of Pawthenticity
  • INK: Close to Cocoa
  • PAPER: Retired DSP, Basic Black, Whisper White, Real Red, Creamy Caramel
     Only Orange
  • ACCESSORIES: Magenetic Strip, Jewel Sticker (non-SU)
  • TOOLS: 1 1/4" Circle and 1 3/8" Circle Punches, Stampin' Up Bear Die, Kooky Spooky Die, Sizzlits Beary Girl, Bigz Beary Essentials Die, Berry Merry Die, Big Shot, Sizzix Lollipop Letters Dies

Hope you enjoyed this project as much as I do! Thanks for stopping in to visit!
Hugs,

Monday, December 14, 2009

Stampin' Up Merry Christmas Basket Project

Hey there stampers!  Here is a project from the Stampin' Up Site! Super cute and everyone knows it's all about the packaging!

MERRY CHRISTMAS BASKET

Line a die-cut basket with our exclusive paper for a neightbor gift that's sure to please. We love the combination of our Christmas Cocoa flocked paper and our vintage-style Yuletide Christmas stamp set!

    INGREDIENTS:


    Enjoy your day and make some time to stamp!!
    Hugs,

    Sunday, December 13, 2009

    Rudolph's Red Nose Repair Kit

    Hey there stampers! So happy you haven't given up on me and my lack of posts earlier this month!
    Today's project is a Rudolph's Red Nose Repair Kit.  Too cute and so fun to give to kids or to put in someone's stocking!


    STEPS:


    1. Filla  Small Cello Bag with some Red Hots Candy and tape top closed.
    2. Wheel a background in Certainly Celery on Very Vanilla card stock.  I used the retired Mistletoe Wheel, but Soft Holly would look great too!
    3. Staple topper onto your Cello Bag and add the wording printed from your computer.
    4. Stamp the reindeer from Merry & Bright (retired) in Close to Cocoa and color in nose red.  The reindeer from Sparkly and Bright would be super cute!
    5. Punch reindeer with 1 3/8" Circle Punch and layer onto Real Red punched with the Scallp Circle Punch.  Adhere to bag.


    INGREDIENTS:


    • STAMPS: Merry & Bright (retired), Mistletoe Wheel (retired)
    • INK: Close to Cocoa, Real Red Stampin' Write Marker, Certainly Celery
    • PAPER: Real Red, Very Vanilla
    • ACCESSORIES: Staple, Small Cello Bag
    • TOOLS: Scallop Circle, 1 3/8" Circle Punch

    Thanks for stopping by!
    Hugs,

    Saturday, December 12, 2009

    Easy & Creative Gifts for a Neighbor or Coworkers!

    Hey there stampers!  Glad you stopped by to see me! :)
    Here's a quick and easy gift to make for neighbors or coworkers!


    Links:  
    Gifts for Neighbhors Supply page
    Holiday Gift-Giving Guide (pdf)


    Hope you are enjoying your weekend!  Only 12 more shopping days til Christmas! Agh!
    Hugs,

    Friday, December 11, 2009

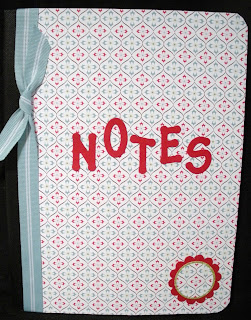
    Altered Composition Book

    Hey there stampers! Hope you are all doing well! :)

    Here's a super easy project that would be perfect for almost anyone!


    STEPS:


    1. Add DSP to a composition notebook using Sticky Strip to make sure it says.  Be sure to measure each one as they are not all the same size!!  I used the retired Ski Slope DSP from last year.
    2. Add Ribbon to the front cover and tie into a knot.  I used retired Baja Breeze ribbon here.
    3. Die cut Real Red card stock using your Big Shot and the Sizzix Lollipop Letters and adhere to cover.
    4. Add Real red punched with the Scallop Circle Punch and some more of your DSP punched with the 1 3/8" Circle Punch.  You can add an initial inside that if you know who you are giving it to.

    INGREDIENTS:


    • STAMPS: none
    • INK: none
    • PAPER: Ski Slope DSP (retired), Real Red
    • ACCESSORIES: Baja Breeze Ribbon (retired), Sticky Strip
    • TOOLS: Scallop Circle and 1 3/8" Circle Punches

    Hope you are having a terrific day and thanks for coming by!!
    Hugs,

    Thursday, December 10, 2009

    Great Gifts for Card Makers & More!

    Hey there stampers!  thanks for stopping by!

    Check out the terrific things you can buy for your favorite card makers and stampers!  check out the links below for some great deals!


    QUICK LINKS:

    Have a super day!
    Hugs,

    Wednesday, December 9, 2009

    Stirring Up Some Christmas Cheer

    Hey there stampers! Here's a project I made for my upcoming Boutique here in Simi Valley this Fri. the 11th from 5:30-8:30.  If you are in the area and would like to stop by email me and I'll send you the details!  There will be many more vendors, raffles, a gift wrapping station and a chocolate fountain (do I need to go on?)
    Today's project is super simple and perfect for office staff, neighbors and friends! 


    STEPS:


    1. Take a Medium Cello bag and insert and spatula inside.  Add candy and tie off around handle.
    2. Add some decorative holiday flowers and greenery with a Pop Up Glue Dot to secure.
    3. Tie some ribbon around top of handle and add a tag.  I used the Cute and Curly Tage Punch and simply wrote my wording with a Stampin' Write Marker.


    INGREDIENTS:


    • STAMPS: Cute & Curly
    • INK: Real Red, Basic Black Stampin' Write Marker
    • PAPER: Whisper White
    • ACCESSORIES: Holiday greenery, Pop-Up Glue Dot, Ribbon
    • TOOLS: Cute and Curly Label Punch

    Have a great day!
    Hugs,

    Tuesday, December 8, 2009

    Gift Card Holders A La Patty Bennett

    Hey there stampers! I know, I know, where have I been?!? How could I leave you at a time when you might need some Holiday Card and gift inspiration!  My life has been incredibly crazy and unfortunately my blogging has suffered for it!
    Today I have an easy gift card holder that I completely cased from the fabulous Patty Bennett!  She has directions right on her blog.  I only changed it a bit.


    Open with belly band slid down


    INGREDIENTS:


    • STAMPS: none
    • INK: none
    • PAPER: Christmas Cocoa DSP, Real red, Whisper White, Soft Suede
    • ACCESSORIES: Jewel Sticker (non-SU)
    • TOOLS: Scallop Circle Punch, Snoflake Punch, Word Window

    Thanks for your patience with me!
    Hugs,

    Saturday, December 5, 2009

    Retiring Stamp Sets

    Hey there stampers! I know it's been really quiet around here! I have been overwhelmed with family things, school functions, and getting ready for my upcoming boutique on the 11th and just haven't been able to get anything posted. I hope you'll bear with me as i try to get it all together again!

    In the meantime Stampin' Up! posted some stamp sets from the dormant list that will be retiring on Jan. 4th.  Check it out and make sure you get any you like before they are gone!

    The following stamp sets will be discontinued on January 4, 2010. Click on Item # to see stamp set!

    Item #
    Stamp Set
    Last Publication this Set Appeared in
    Page #
    113407
    Backwoods
    2009 Spring-Summer Idea Book & Catalogue
    102
    114492
    Beautiful Baby
    2009 Spring-Summer Idea Book & Catalogue
    208
    114486
    Birthday Wish
    2009 Spring-Summer Idea Book & Catalogue
    208
    113200
    Branch Out
    2009 Spring-Summer Idea Book & Catalogue
    100
    114496
    Celebrations
    2009 Spring-Summer Idea Book & Catalogue
    208
    113732
    Central Park
    2009 Spring-Summer Idea Book & Catalogue
    106
    113206
    Classic Sketches
    2009 Spring-Summer Idea Book & Catalogue
    119
    113226
    Classy & Fabulous
    2009 Spring-Summer Idea Book & Catalogue
    51
    113750
    Easter Beauty
    2009 Spring-Summer Idea Book & Catalogue
    29
    114024
    Bella Pascua
    2009 Spring-Summer Idea Book & Catalogue
    29
    114498
    Flowers in Silhouette
    2009 Spring-Summer Idea Book & Catalogue
    208
    113405
    Font of You
    2009 Spring-Summer Idea Book & Catalogue
    46
    113216
    For the Bride
    2009 Spring-Summer Idea Book & Catalogue
    61
    114028
    Para la novia
    2009 Spring-Summer Idea Book & Catalogue
    61
    114494
    Forever
    2009 Spring-Summer Idea Book & Catalogue
    208
    109425
    Friend by Definition
    2008 Fall-Winter Idea Book & Catalogue
    135
    114488
    Fun Flowers
    2009 Spring-Summer Idea Book & Catalogue
    208
    113716
    Garden Greetings
    2009 Spring-Summer Idea Book & Catalogue
    55
    114490
    Glad Friends
    2009 Spring-Summer Idea Book & Catalogue
    208
    111580
    Grand Soiree
    2008 Fall-Winter Idea Book & Catalogue
    126
    113242
    Hit the Road
    2009 Spring-Summer Idea Book & Catalogue
    103
    113710
    Lexicon of Leaves
    2009 Spring-Summer Idea Book & Catalogue
    101
    113236
    Man's Best Friend
    2009 Spring-Summer Idea Book & Catalogue
    72
    114423
    Ocean Commotion
    2009 Spring-Summer Idea Book & Catalogue
    97
    113728
    Playful Petals
    2009 Spring-Summer Idea Book & Catalogue
    99
    109276
    Polka Dot
    2008 Fall-Winter Idea Book & Catalogue
    135
    111544
    Putt Putt
    2008 Fall-Winter Idea Book & Catalogue
    81
    113240
    Quilt Quips
    2009 Spring-Summer Idea Book & Catalogue
    53
    113547
    Really Retro
    2009 Spring-Summer Idea Book & Catalogue
    132
    113403
    Sip by Sip
    2009 Spring-Summer Idea Book & Catalogue
    51
    113726
    Sweet Stems
    2009 Spring-Summer Idea Book & Catalogue
    99
    113250
    That's Funny
    2009 Spring-Summer Idea Book & Catalogue
    63
    113688
    Wonderful Watercolors
    2009 Spring-Summer Idea Book & Catalogue
    85
    114032
    Acuarelas Maravillosas
    2009 Spring-Summer Idea Book & Catalogue
    85

    Take care and stay tuned for some Holiday Blog Candy!

    Hugs,

    Monday, November 30, 2009

    Magenetic Calendars

    Hey there stampers! Hope you are having a great day!
    Today's project is a magenetic calendar made using some retired and current DSP, some coasters, ribbon and magnets!  Super easy, handy and fun!  I got the self-adhesive calendars from Vippies.


    STEPS:


    1. Cover front and back of coasters using DSP and Snail.  Trim edges and use sanding block to smooth it out.
    2. Adhere calendar to coaster and tie ribbon around it.
    3. Adhere adhesive backed magnet strip to back of coaster.
    Thanks for stopping by!

    Hugs,

    Sunday, November 29, 2009

    Elf Box

    Hey there stampers! Thanks for stopping by!

    Today's project is another fantastic one I CASEd from Tammy.  I thought he was just too cute!!


    Don't forget to check out the Holiday Extravaganza going on only until Monday!! Click HERE to check it out!
    Hugs,

    Thursday, November 26, 2009

    Snowman Box

    Hey there stampers! Hope you had a fantastic Thanksgiving!
    Today's project is another one I CASEd from Tammy at her blog HERE .  I used the Fancy Favor Box for my base and then added the decorated Top Note pieces to it.  I LOVE these!


    Have a great day and thanks for stopping by!


    Hugs,

    Wednesday, November 25, 2009

    Clip Board Post It Notes

    Hey there stampers! I'm so glad you stopped by to visit!
    Today's project is another one I had for my boutique.  Super simple and cute!


    STEPS:


    1. Adhere DSP to front and back of chip board coaster (mine are from Chili's Restaurant!!)  Add a pad of post-it notes secured with a mini binder clip covered with some of the same DSP.  Add coordinating ribbon to the clip.


    INGREDIENTS:


    • STAMPS: none
    • INK: none
    • PAPER: Night & Day Specialty and Christmas Cocoa DSP
    • ACCESSORIES: Binder clips, coasters, various ribbon

    Have a terrific day and hope to see you again tomorrow!
    Hugs,

    Tuesday, November 24, 2009

    Decorative Peppermint Patties

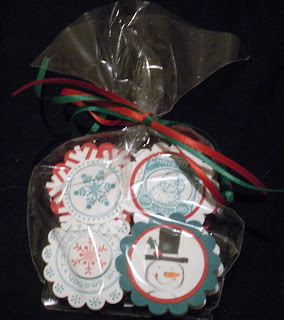
    Hey there stampers!  I decorated some peppermint patties and packaged them up in a cello bag with ribbon.  Super easy and a simple gift for those people you'd like to remember for the holidays but don't want to spend a lot of money. :)


    STEPS:


    1. Stamp various Christmas themed stamps and punch with the 1 3/8" Circle Punch add to coordinating card stock punched with the Scallop Circle Punch and adhere to peppermint patty.


    Hope you are having a great day!

    Hugs,

    Monday, November 23, 2009

    Stampin' Up! - Online Extravaganza

    HOLIDAY EXTRAVAGANZA!  Nov. 23-30 only!
    Hey there stampers! You have to check out this Holiday Extravaganza that Stampin' Up has happening this week only! Great deals on bundled products-up to 50% off!! Don't miss out! Click on image above or on Extravaganza button in the right column!

    Hugs,